Custom Search
|

|
|---|
|
|
|---|
|
|
|---|
|
Custom Search
|
|
|---|
Recommended for developers:

![]()
Lesser Goldfinch family preening
![]()
LCD Vs. CRT - Do LCDs finally match CRTs in picture quality?
ECS P965T-A Motherboard
ABIT AN8 SLI Motherboard
Foxconn 975X7AB-8EKRS2H Motherboard
Foxconn BlackOps Motherboard
![]()
My misadventures flying with Allegiant Air
![]()
The Missing Post Mystery
A post I made to a Vista newsgroup was missing from the Outlook newsreader
Where did it go?
The Missing Post Mystery Revisited
It happened again! A post I made to a Vista newsgroup was missing from the Vista Mail newsreader
Where did it go?
A Case of Maxtaken Identity
When is a hard drive not a hard drive? Find out when!
![]()
Changes to the Windows 7 Taskbar You Should Know About
Vista Image Capture 'Slipstream' SP1 and SP2 into a single Vista install disc
Detailed Instructions for Reverse Integrating SP1 and SP2 into Vista
What is RAID? Some RAID Basics
RAID 5 on a Desktop PC
How to Personalize Windows Vista
Develop and Implement a Personal Backup Plan
Ten things you can do to create better documentation
(Tech Republic)
Flash Your BIOS
Three Good Reasons for Flashing Your BIOS
Ten common mistakes you should avoid when flashing your BIOS
(Tech Republic)
Find a new dial-up ISP
Sign up for 10 free hours of NetZero access!
Create a Shutdown/Sleep/Restart or Continue Icon For the Vista Desktop
What is a computer guy doing with home remodeling projects on his Website?
The Upscale Utility Room Remodel with Catch Basin and Wraparound Ceramic Tile Wall
The Bathroom Remodel for Under $1000 Project
The Do It Yourself Bedroom Engineered Prefinished Red Oak Wood Flooring Installation From Hell
Bedroom Remodel With Wood Parquet Flooring
Use Comodo Internet Security 4.0 to Lock Down Your PC Following a Windows Install or Reinstall
![]()
The Northstar Horizon Microcomputer
![]()
Round-Tailed Ground Squirrels

Prairie Dogs

American Kestrel Falcons "Sparrow Hawk"

Arizona Sonoran Desert

Arizona Sunsets

Cienega Creek

Trains In the Desert

Desert and Mountain Flowers

Fox Squirrels

![]()
The Other Reason Why Your Irrigation Valve Might be Leaking
My Response to the Newegg Affiliates Program Changes
Playing the Rebate Game
Know the Rules Before You Play
Vista Confusion
The four questions you need to ask before buying Vista

Click on thumbnail to see a larger image


"This should be fun," I thought at the time. I had no experience in woodworking other than 9th grade shop 35 years ago. I began looking at replacement doors online. They generally started at $30 and went up. Then I would have to purchase veneer to match the doors. After I totaled up the costs I was close to the cost of the Home Depot vanity. Time to get creative.
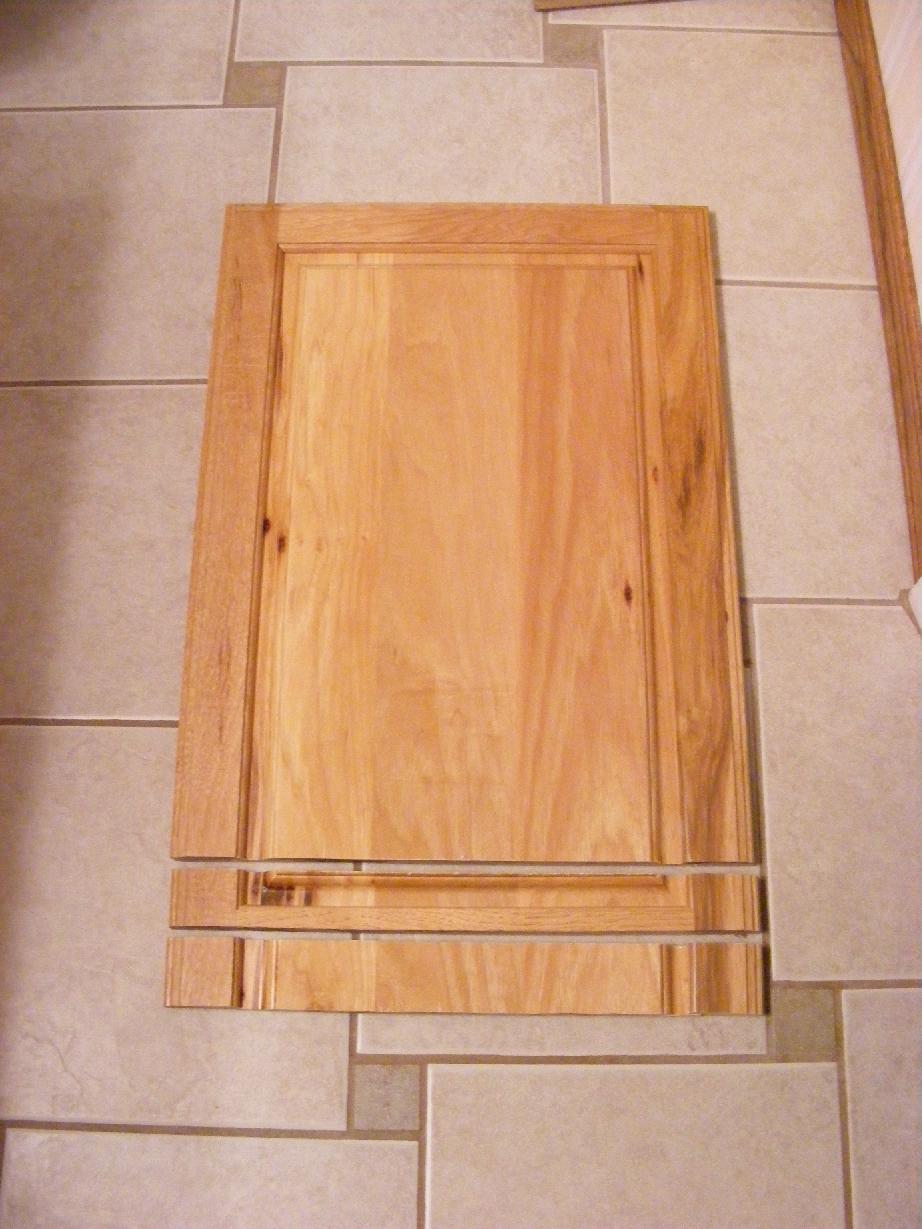
I made my first visit to the Habitat for Humanity Habistore here in Tucson and found some very nice Mills Pride doors. Some had been slightly damaged but I found some oversized doors that I could cut down and make work. Of course at this point I only thought I could make them work but two very nice albeit slightly damaged doors for $5.00 was little to risk. If it didn't work out I wouldn't be out a lot of money.
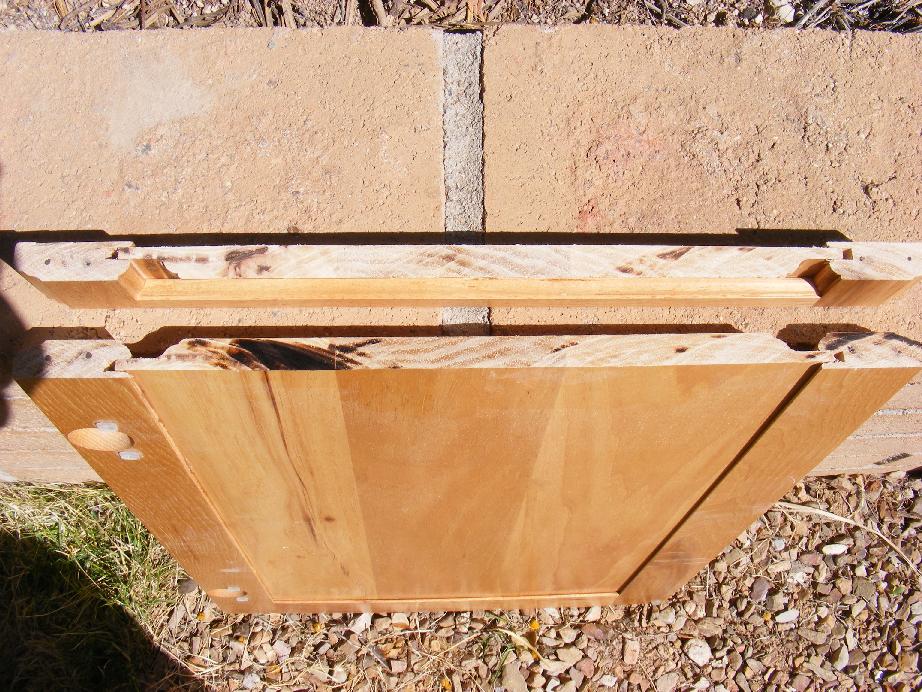
I got lucky in my search. Two of the doors were the exact same height as my vanity and had no fancy routed edges on one side. I decided I could cut off 1 1/4 inches on each and join them together using liquid nails for the right side of the vanity. You can decide for yourself but I think the result looks very nice and this is no thin piece of veneer but a solid chunk of wood on the side panel.
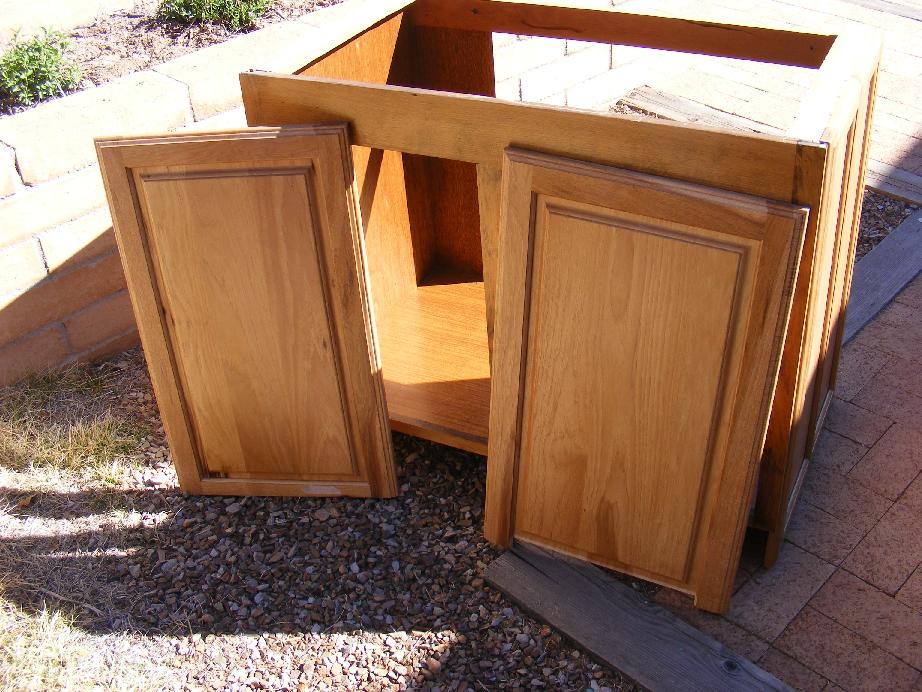
My search uncovered a large tall door that I thought I would be able to cut in half and use for the front doors. This too ended up working out well. The width is perfect meaning that I would only have to cut to match the vanity door height. If you will notice in the pictures, I removed a horizontal piece of wood from the vanity that separates the door from the false drawer fronts simplifying the restoration. I could now have two large doors instead of two doors and two false drawer fronts.
I kept putting off the vanity project. There were plenty of tasks to do. I got the floor done and the shower stepover done.
It was time to do the vanity but instead I worked on some tile work in one of the bedrooms. I finally got down to work on the vanity after figuring out how to configure my radial arm saw for ripping. I had taken a lot of time to think about what I was going to do.
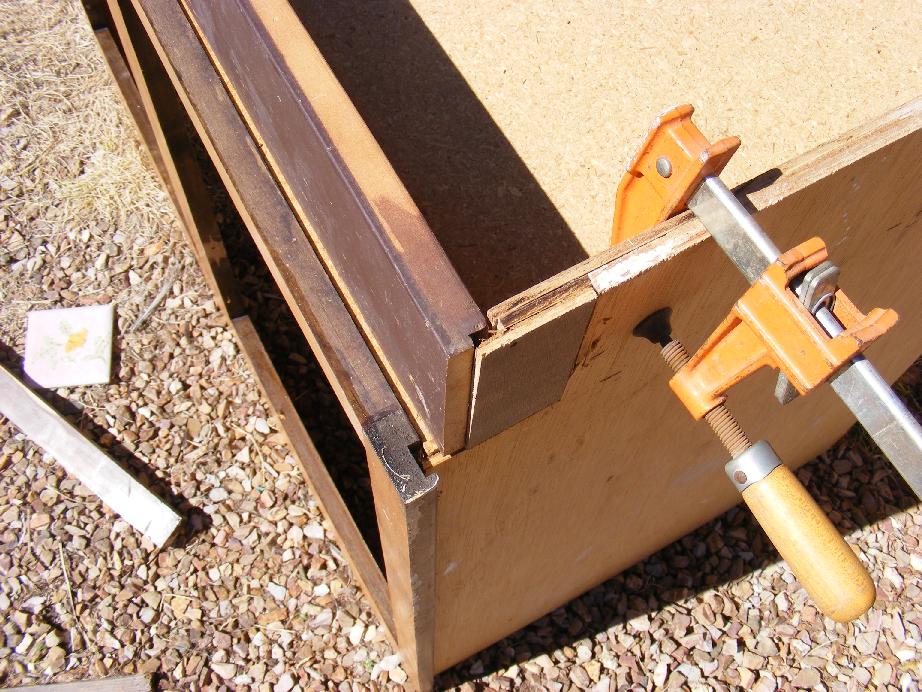
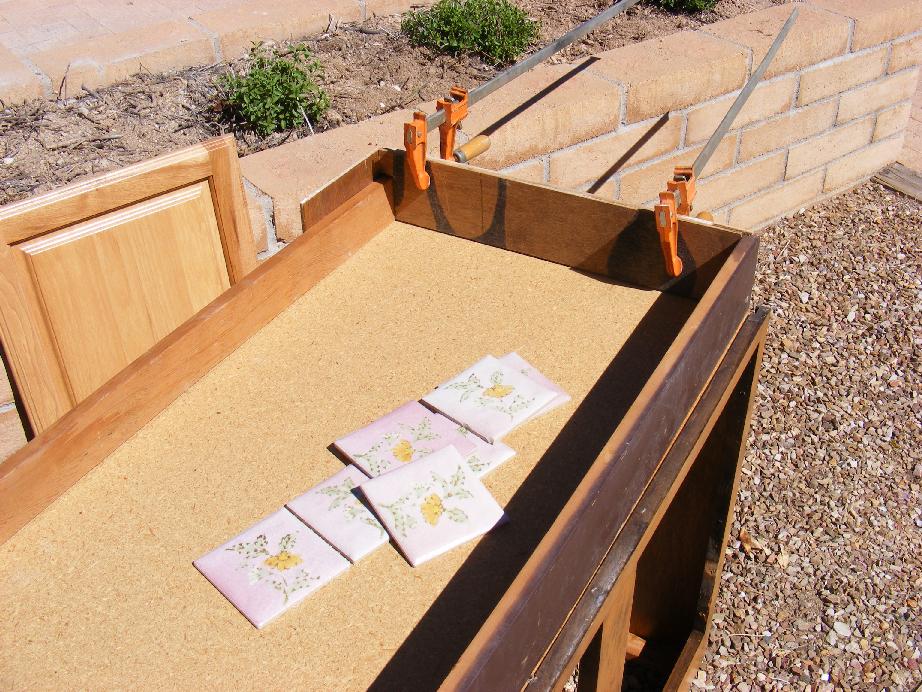
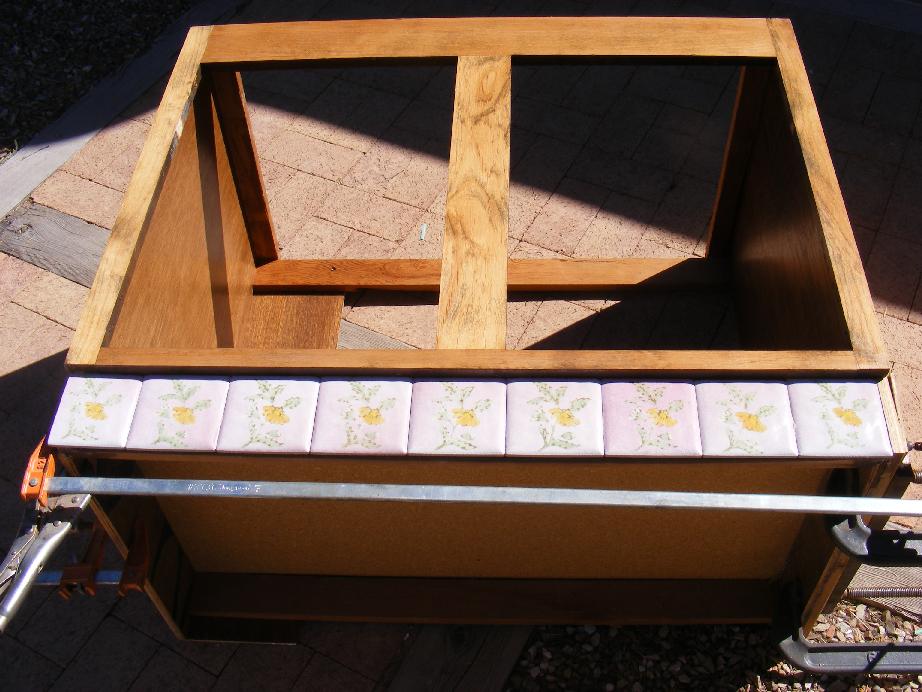
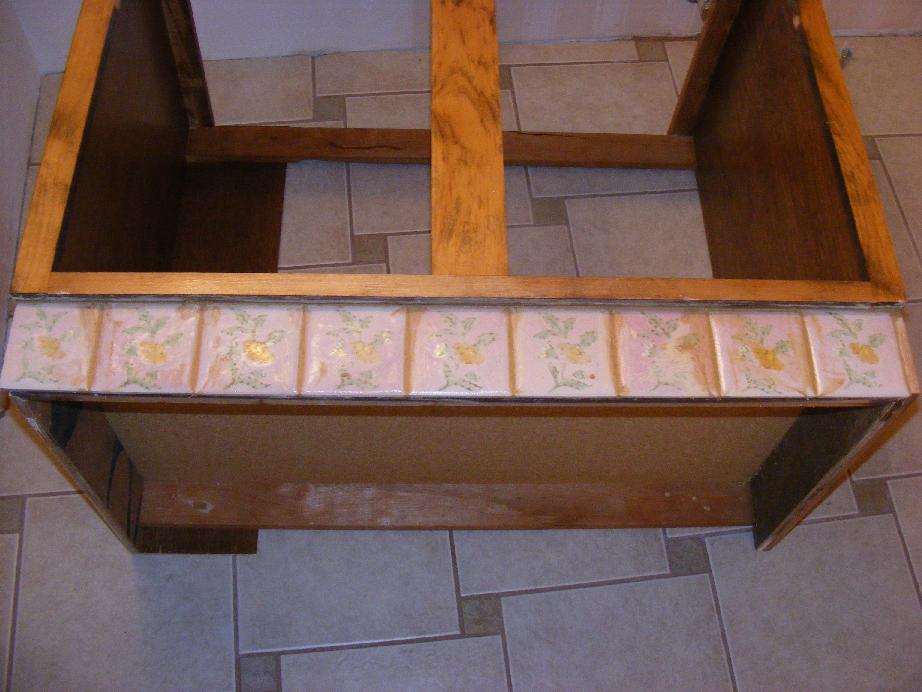
Putting the 'doors' on the side panel meant that I had to move the bottom kickboard out so that it would be flush with the bottom of the side panel. Ugh - this is what I was dreading all along, but when I got down to it I discovered that it wouldn't be so hard after all. It was easy enough to remove the kickboard. I used the old 1/4 side panel to cut small pieces that could fill in the space of the side panel. I also cut two pieces that would go on both sides of the base to tie the old base in with the new pieces. As an extra bonus I set the kickboard back enough to allow a row of deco tiles to fit on the kickboard so the tiles would be flush with the side panel. I used liquid nails and clamped it all together. After a night of curing I tried to pull it apart. I was planning to put a piece of heavy granite on the top of the vanity and I figured that if it couldn't stand the 'pull apart by hand' test it wasn't strong enough to support a granite top. It passed the test with flying colors.
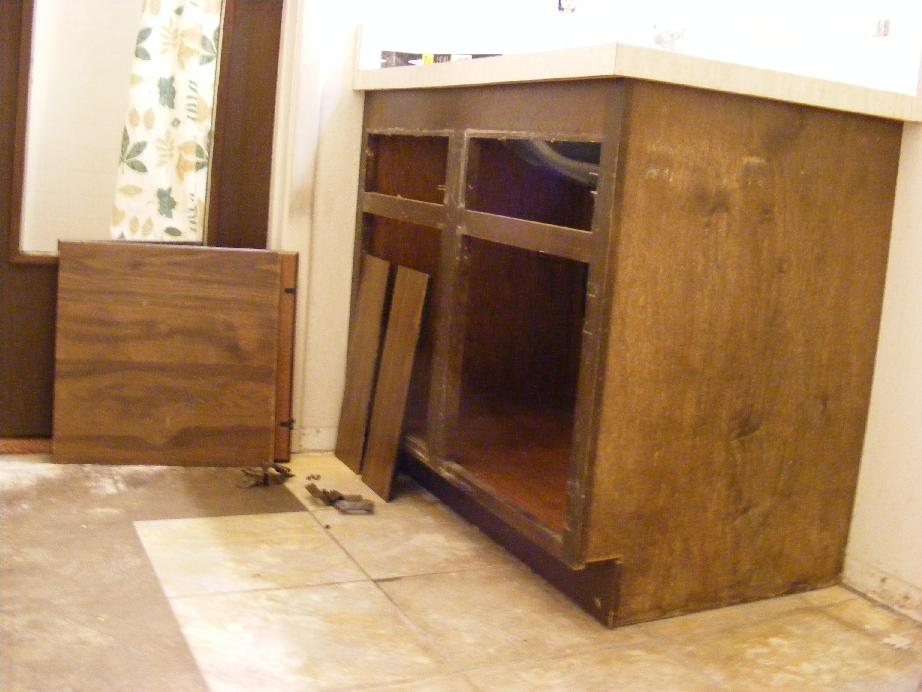
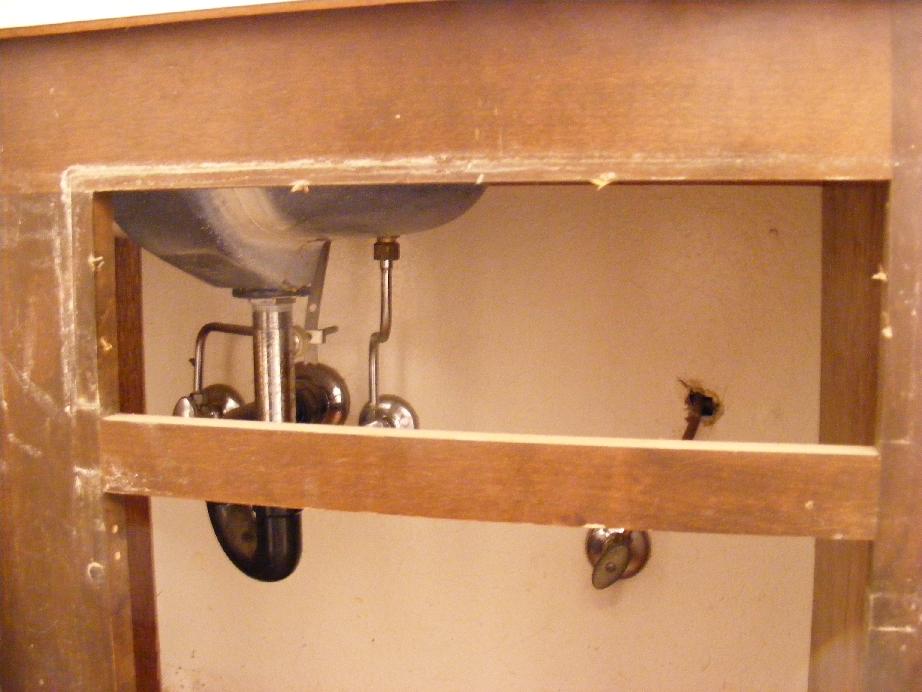
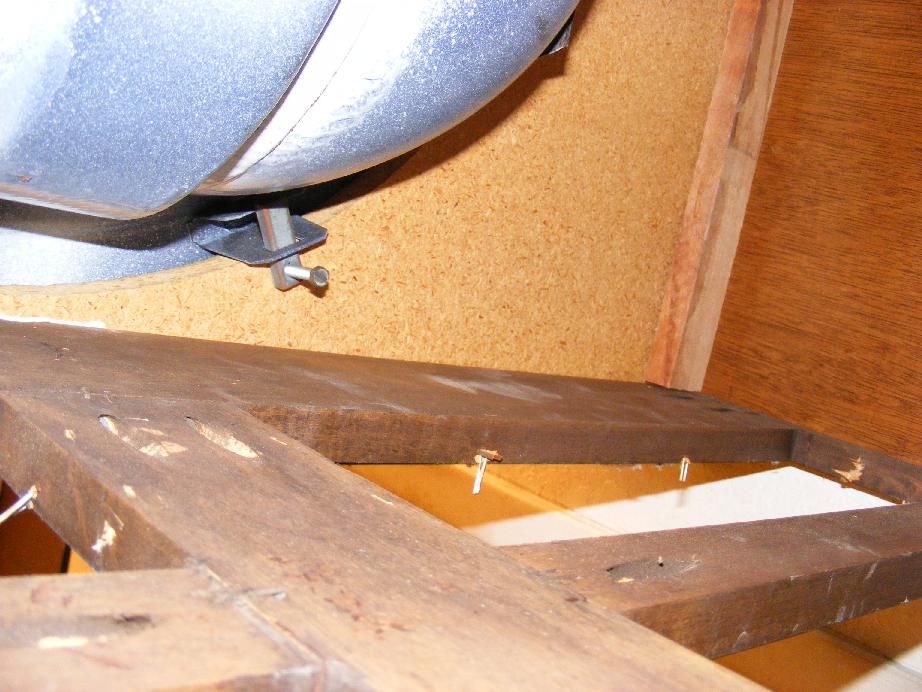
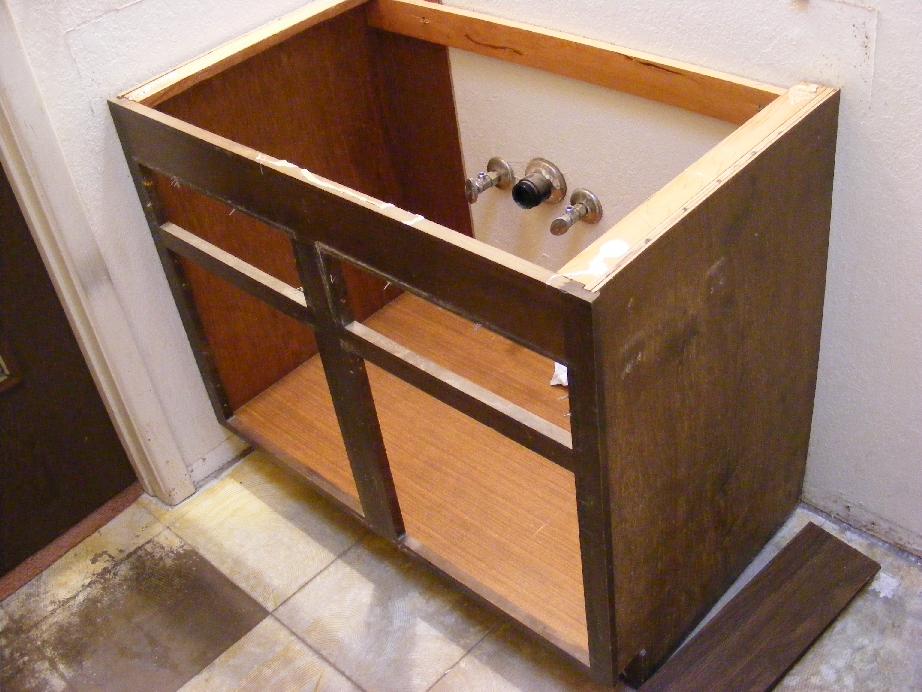
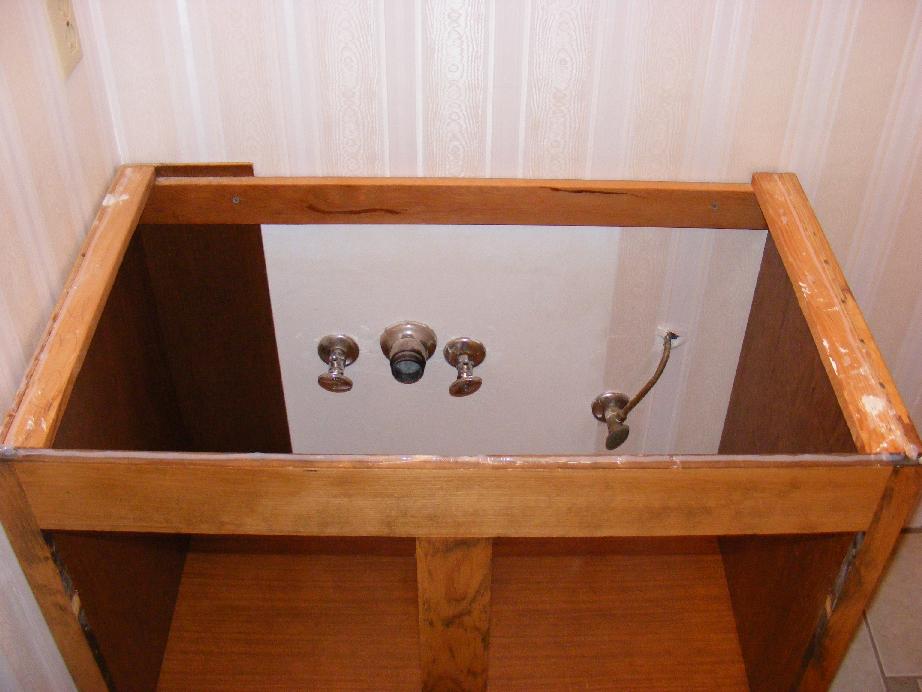
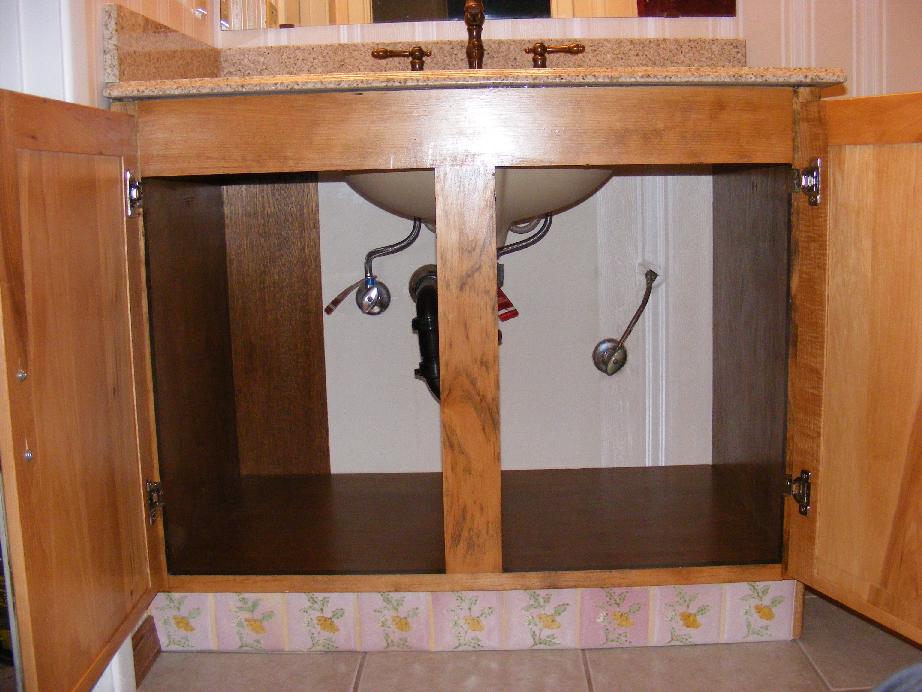
The rest of the pictures are self-explanatory. Beginning with the sink disconnection and removal, the vanity top removal and the disconnection of the vanity from the wall the pictures then progress to the restoration. Here I sanded the front and put on a coat of soft sheen finish polyurethane. I also put a coat on the inside. It looked almost new when done.
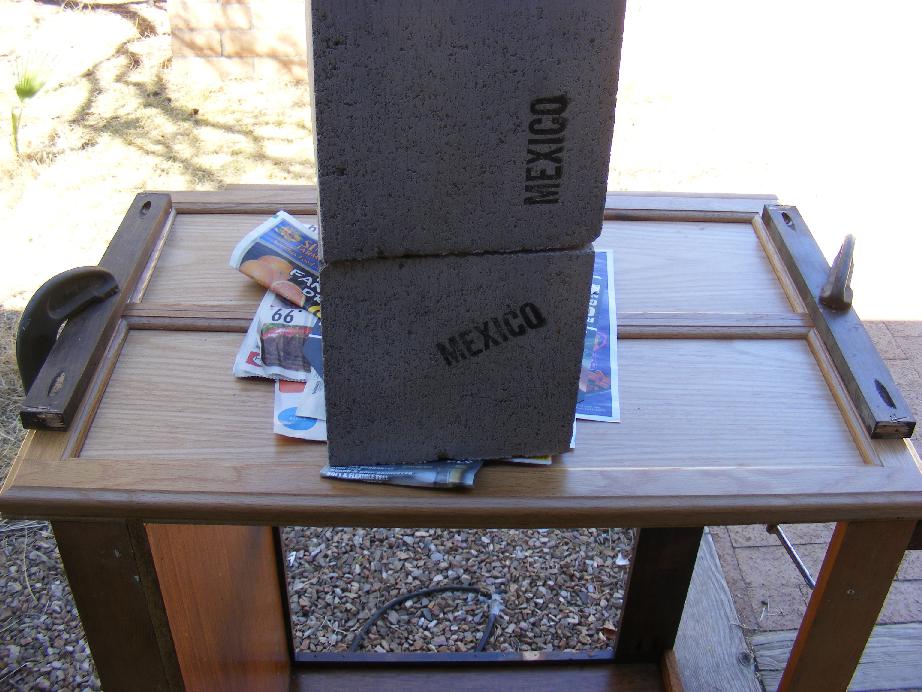
The doors, now turned into a vanity side panel, were easily added using liquid nails and clamped tightly. Two very heavy concrete blocks were put on the middle to inure a clean mating of the 'door' edges.
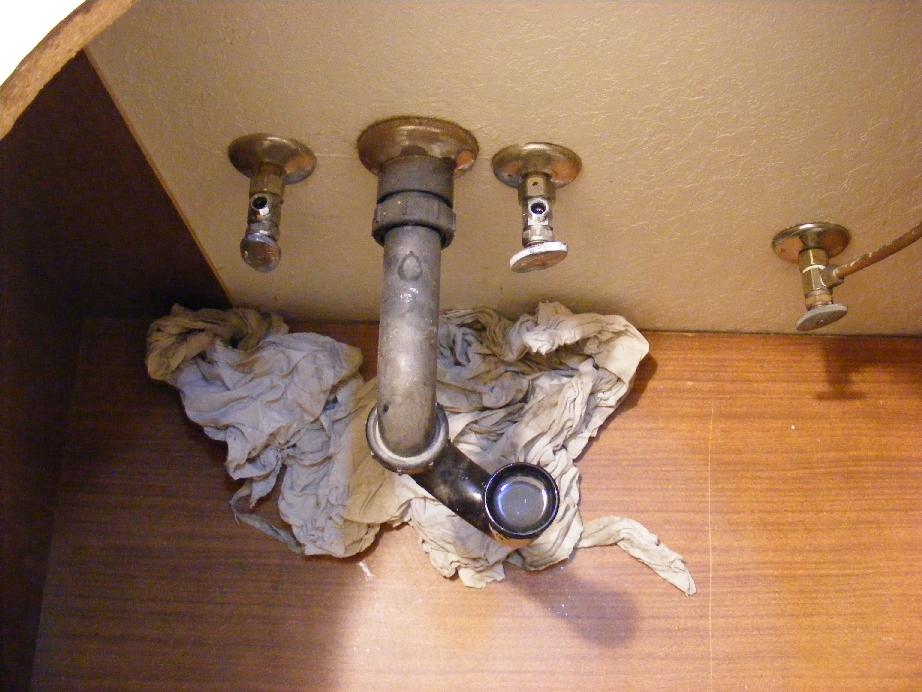
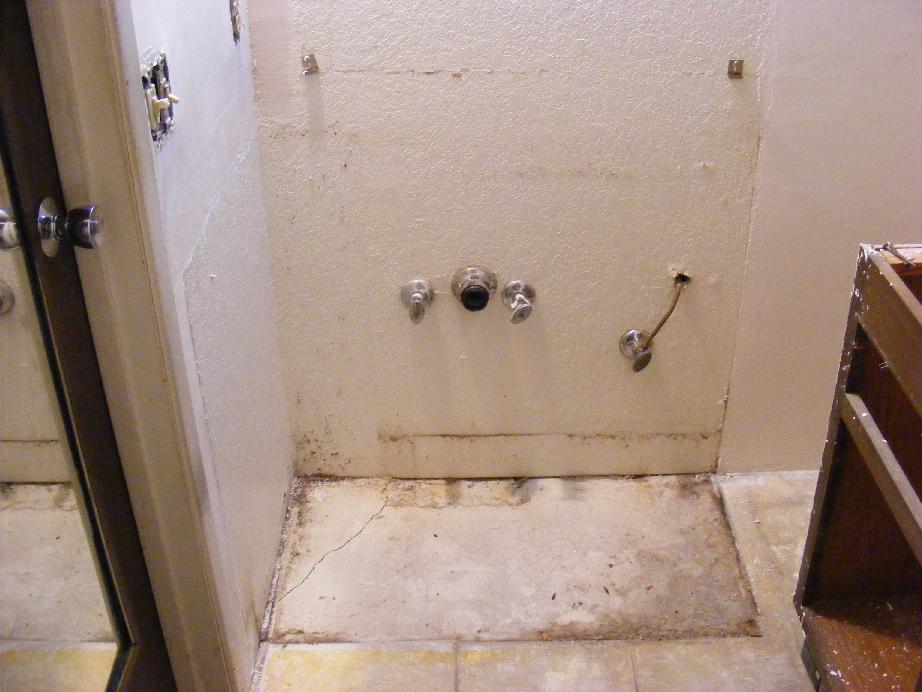
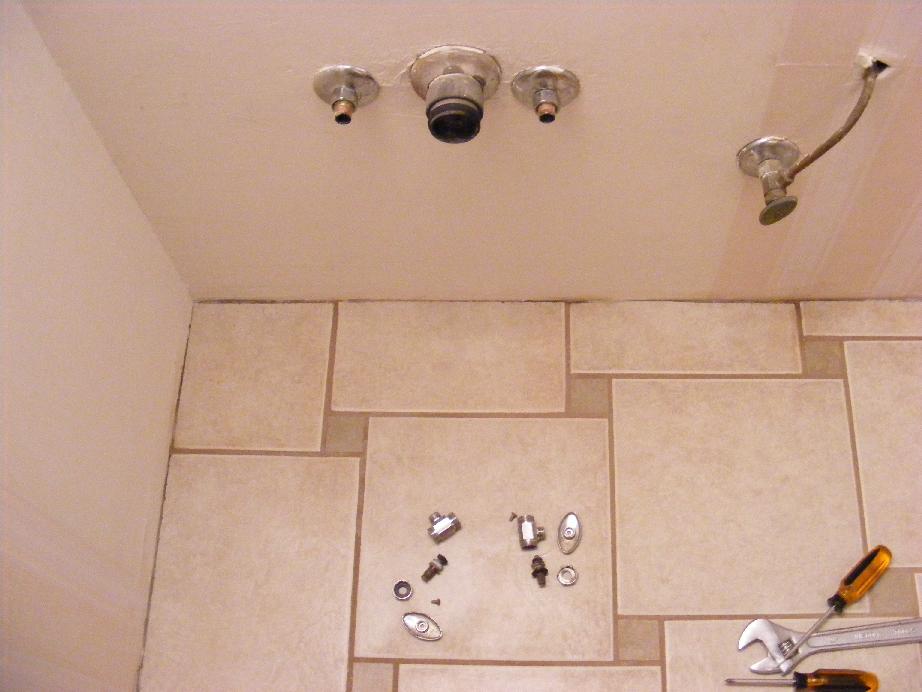
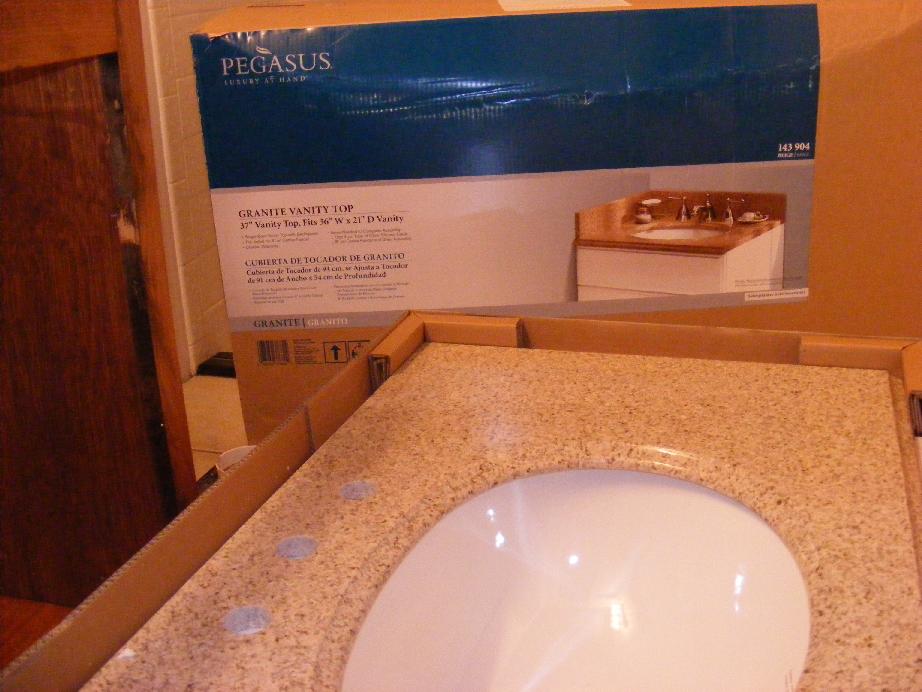
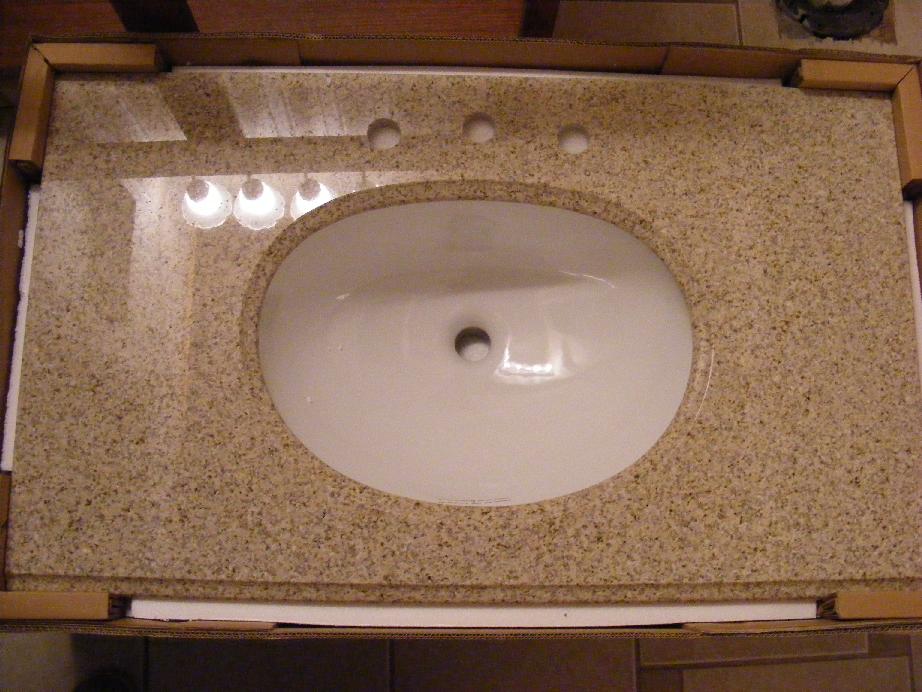
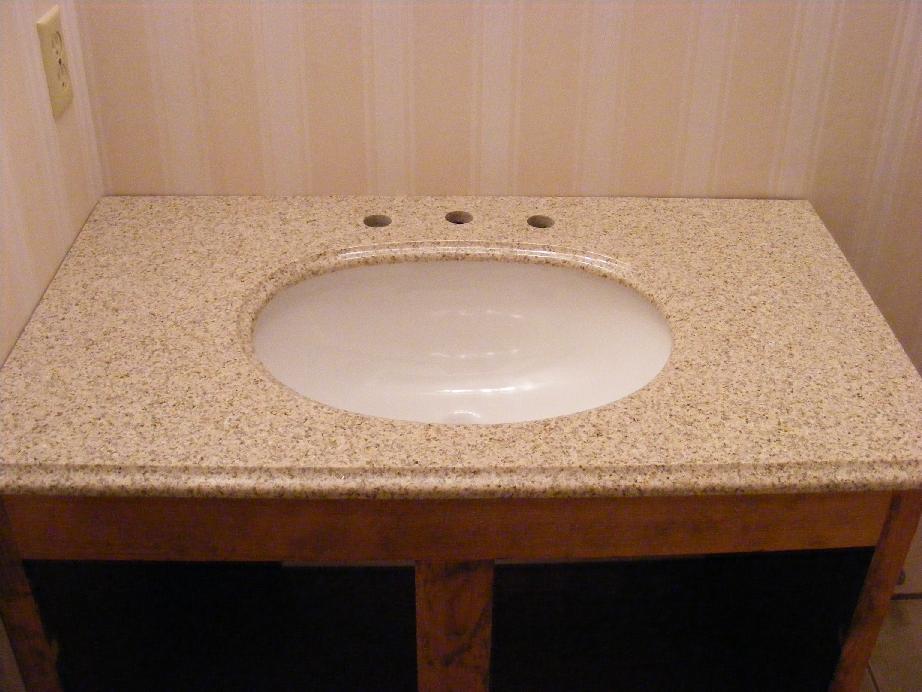
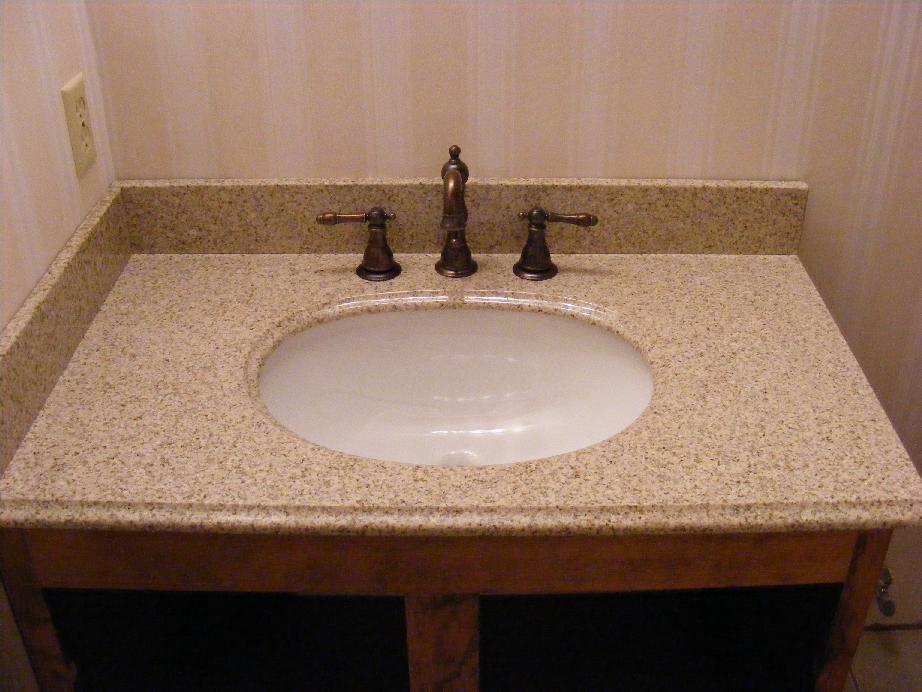
After a night of curing it was time to bring in the vanity and put it back to work doing what vanities do. I had found a very nice granite top at Home Depot. The nice thing was that it came with a sink already installed for the price of comparable granite tops. That was a huge plus not having to worry about the sink install. I also had found a nice oil rubbed bronze finish sink set with some accessories at the Habistore so I was really excited to get to work to install the vanity top and faucet. I decided to 'do the right thing' and replace the washers in the hot and cold water supply valves while I had easy access to them. That only set me back an hour and will be one less project that a new owner will have to do one future Saturday.
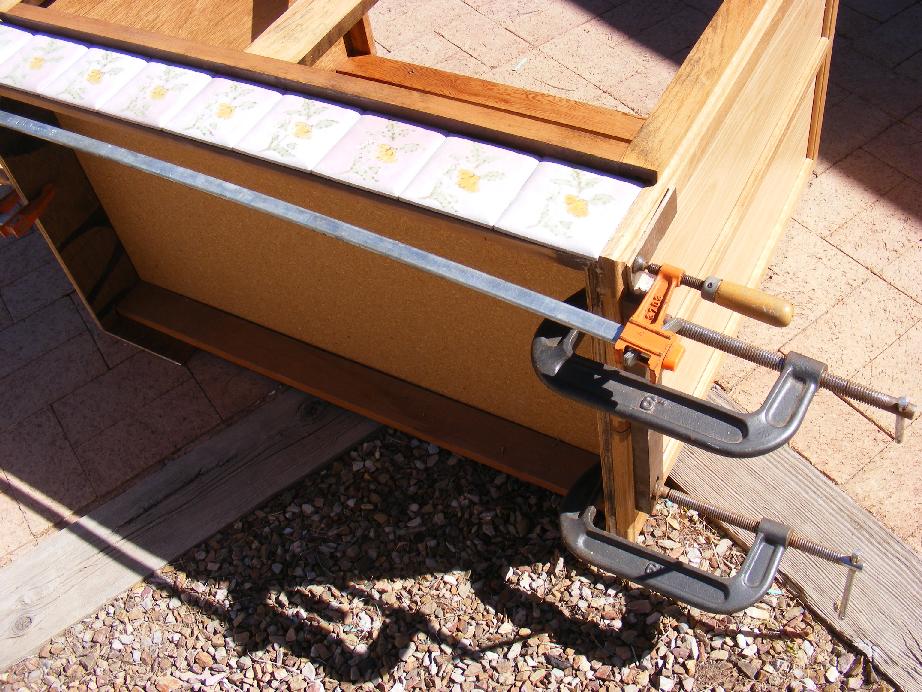
Before attaching the vanity to the wall I also took the time to grout the deco tiles with some Sahara Tan sanded grout. It would be much easier to do it with the tiles parallel to the floor and easily accessible. It was finally time to reattach the vanity to the wall. I used the old screws and screw holes making quick work of that job and eliminating the search for the ever-elusive studs.
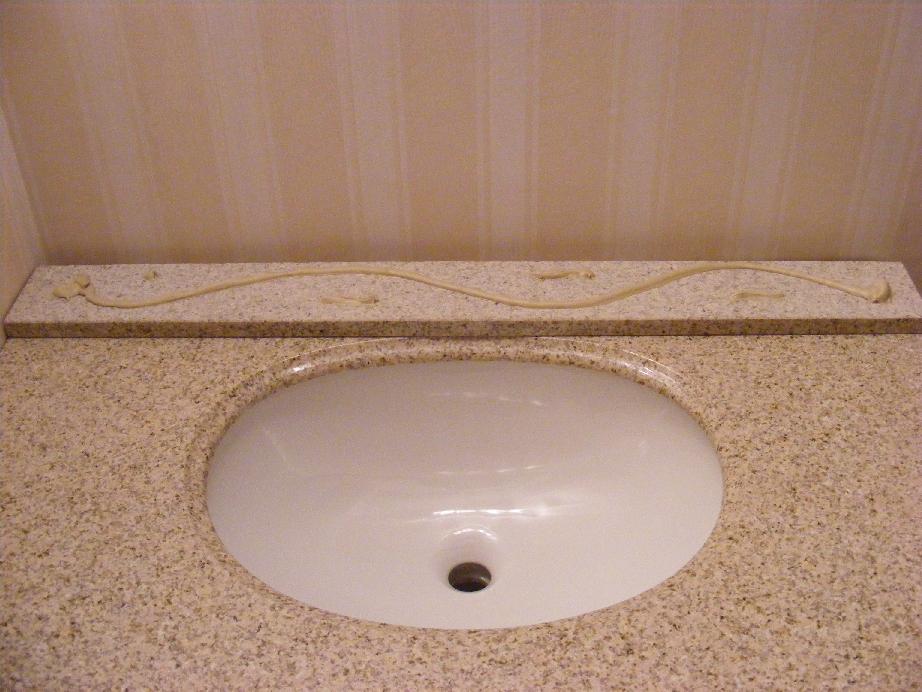
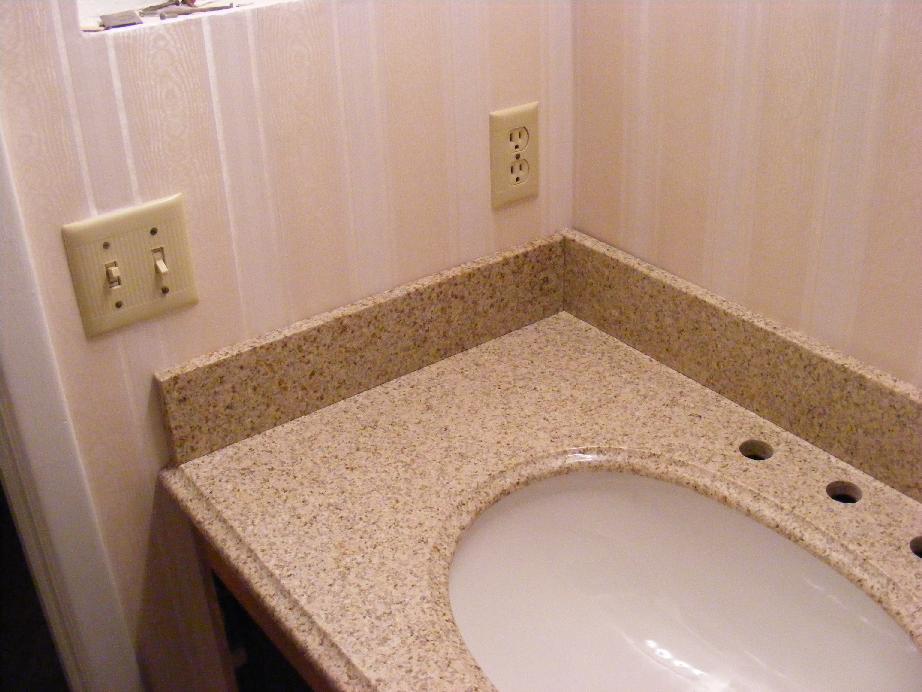
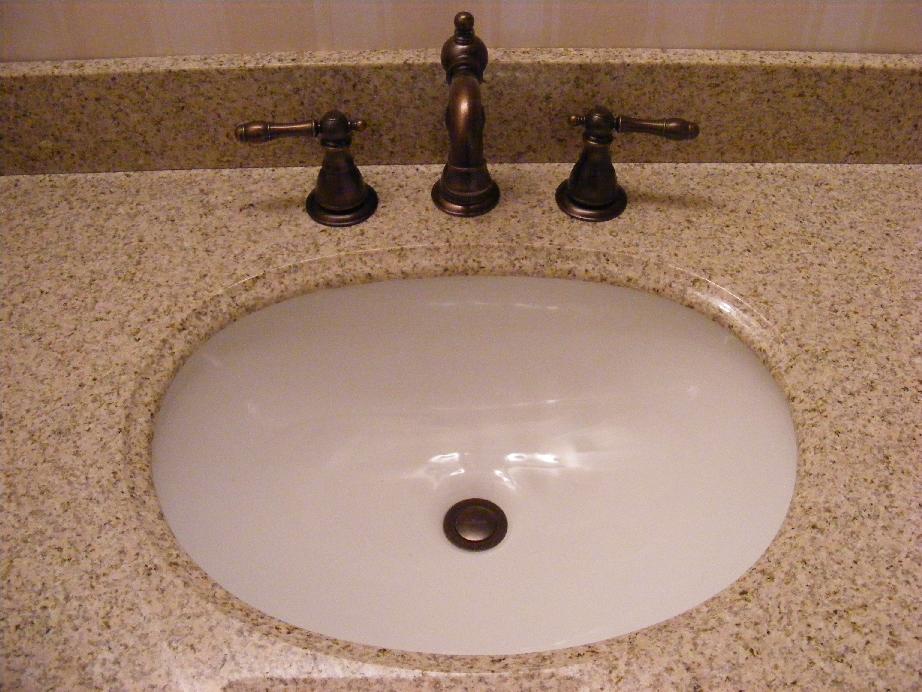
The granite vanity top went on easily enough following the manufacturer's instructions. A bead of silicone went on the vanity top. The back splashguard came with the vanity top. I also purchased the optional side splashguard. They were easily attached using liquid nails.
The faucet and vanity top both turned out to be made by Pegasus. I didn't plan it that way they just turned out to be the best bargains I could find.
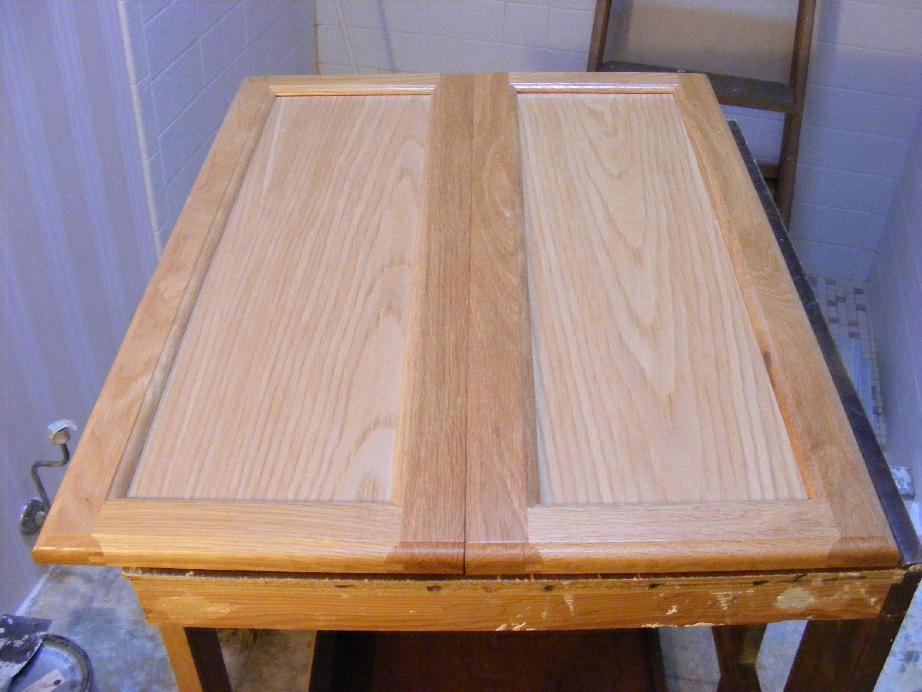
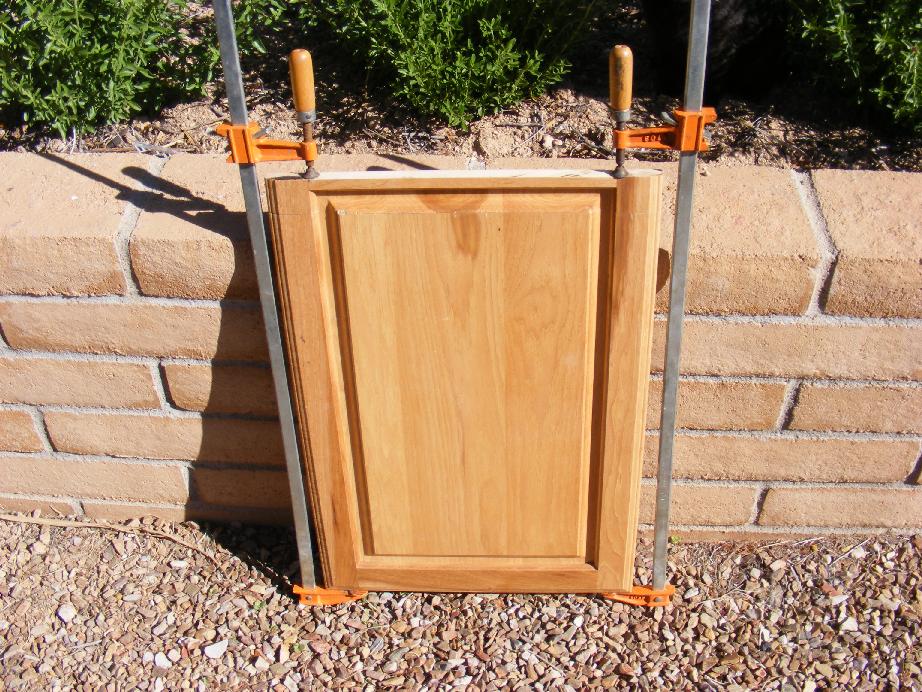
I put off finishing the front doors for quite a while but now it was time to cut that large door that I had gotten at the Habistore. The width was almost perfect. I cut the door in half creating two doors. Each door had two recessed cut out holes for hinges and when both of the doors were turned with the cut edge down I ended up with the hinge sides just where they needed to be with two cutouts on each door. The two doors were still too tall for the vanity so I cut off two inches of the height. I made the first cut just above the bottom routed edge to make the cut as invisible as possible. I made the second cut two inches higher leaving the fancy routed woodwork in place on the bottom of the door.
I then had to figure out how to drill four holes in the two edges so that they would line up. I wanted to join the two door pieces with 1/4 inch fluted dowels. I finally found that a tiny dot of paint where I wanted to drill and then joining the door pieces was the best way to match the drill holes on both door pieces. I first used a small drill bit to drill the pilot holes. I then used a 5/16 inch drill bit to make the hole slightly oversized to allow for small errors. After putting liquid nails and dowels in the holes and a bead on the edge I joined the doors and clamped them snugly. I allowed them to dry for 24 hours and then filled in the cut with colored putty. I used two colors, Golden Oak and American Walnut for the light and dark grain of the wood. I also mixed the two for the shades in between. A thin coat of Polyurethane finished this part of the project. The final look is quite good and hardly noticeable as you can see in the pictures.
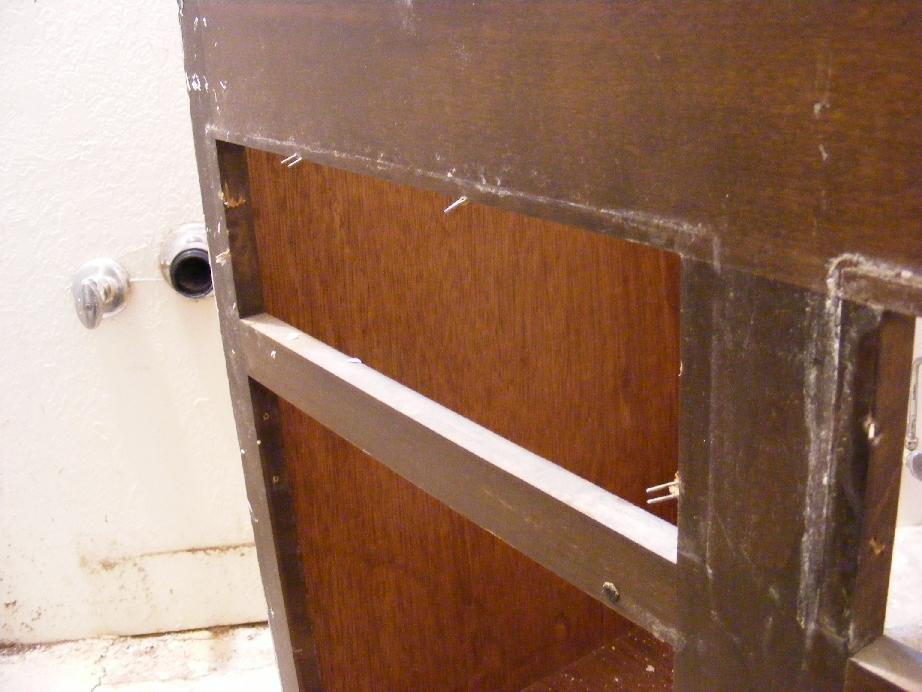
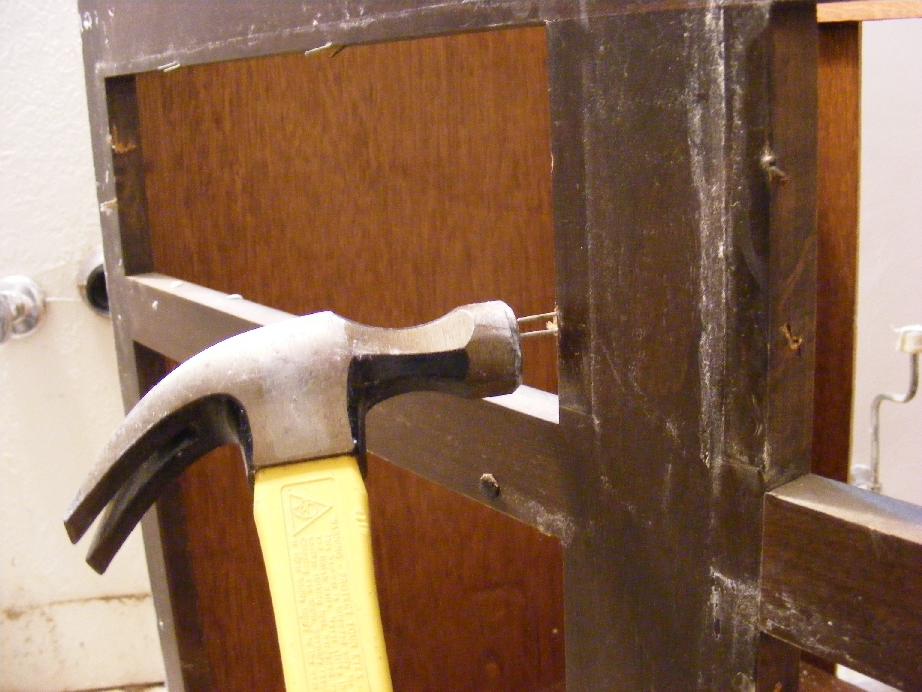
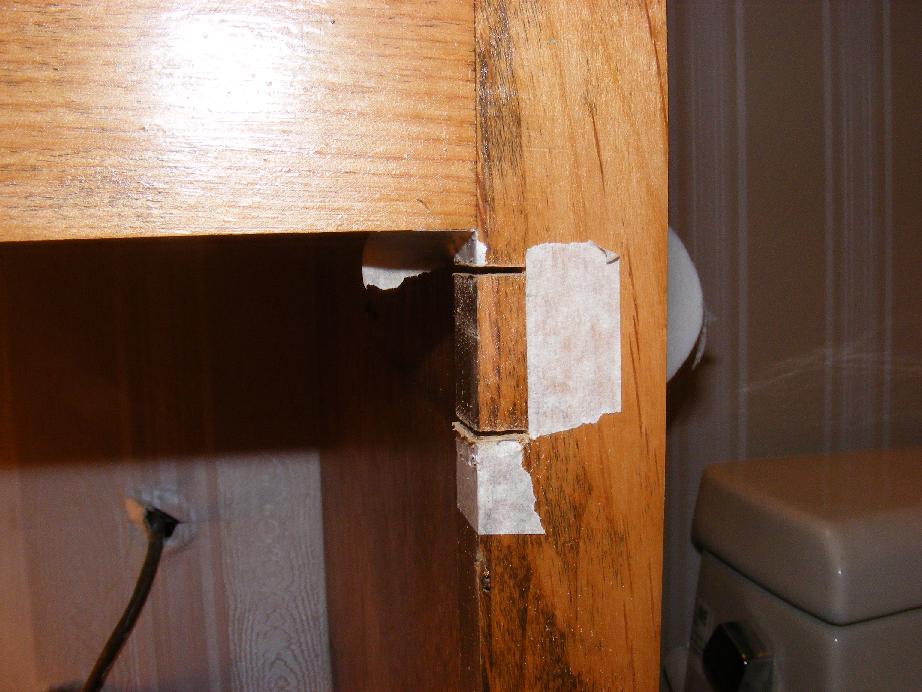
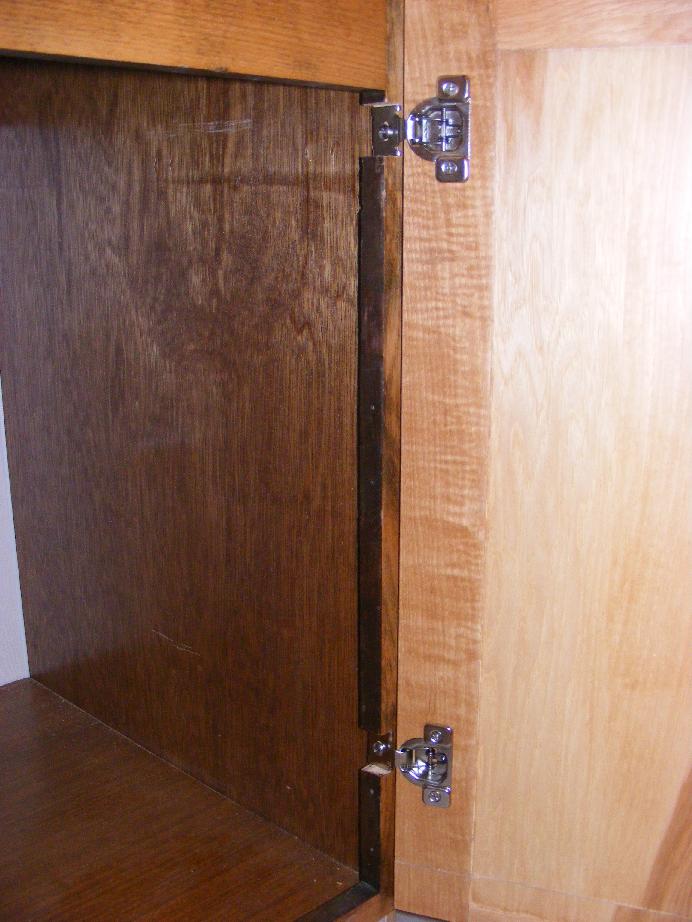
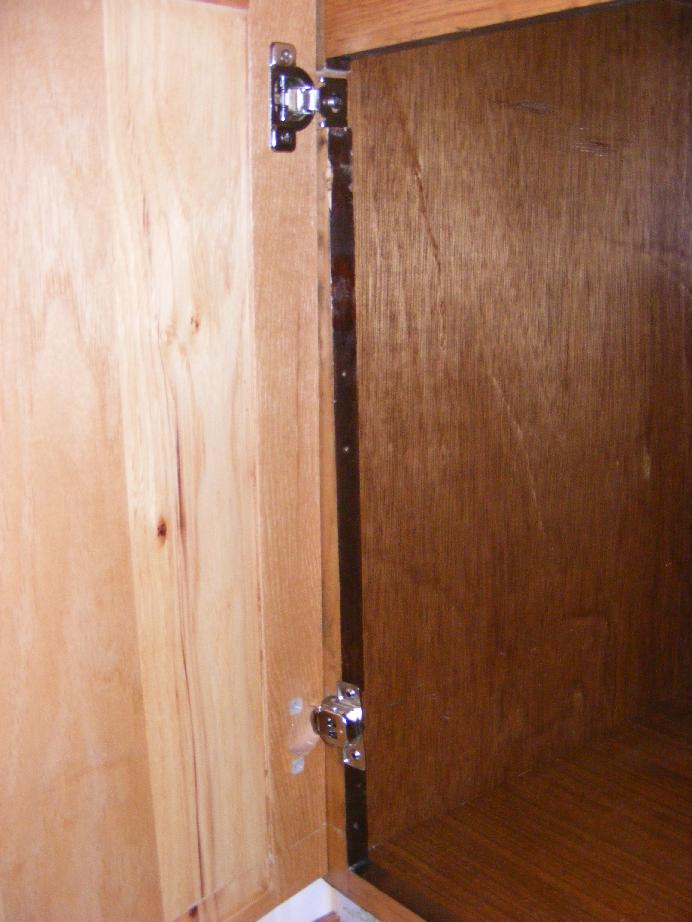
Next I had to hang the doors. I wanted to use the hinges from the old doors but they were just too different and I wanted to take advantage of the existing round cutouts and nylon pieces used to attach the hinges. I found the perfect hidden hinge at Lowes. Now I had to figure out what to do with two doors that were just a little bit too wide. If I hung them to the existing vanity frame the doors would meet in the middle and that just wasn't acceptable. I wasn't about to cut the very nice doors again, this time vertically to remove the extra width. I decided to recess the hinges on the vanity frame. I could see that this was possible without the door scraping against the vanity frame. To make the recessed cut, I cut the top and bottom edges with a hand saw and then used an angle grinder to remove the rest. That wasn't the best way to remove the remaining block of wood but I didn't have a keyhole saw.
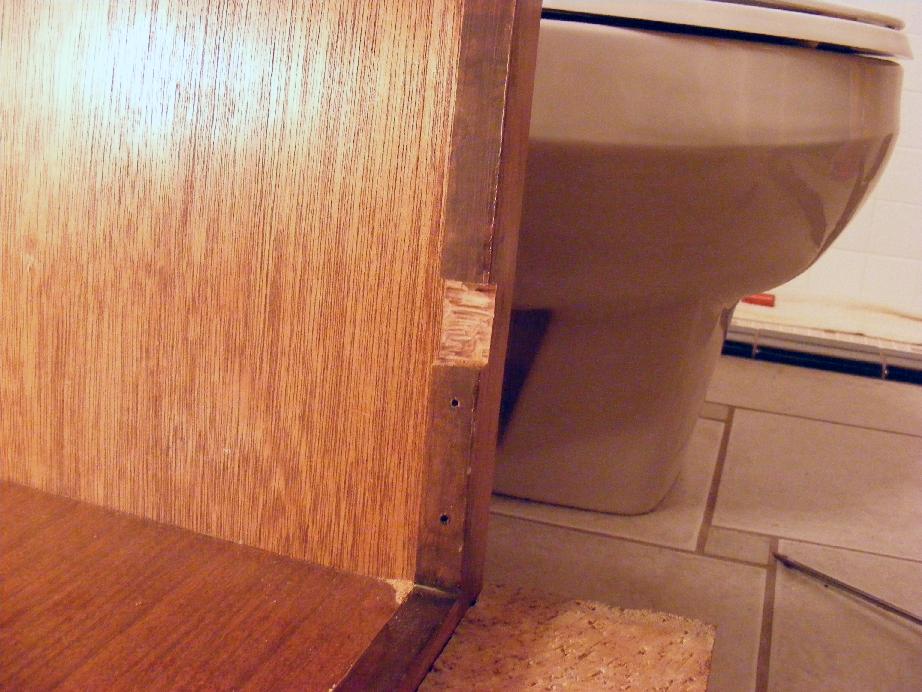
I got too aggressive on the left side of the vanity frame and cut out too much. It was getting late and I was in too much of a hurry. How does that old saying go - Haste Makes Waste? I tried putting in a small piece of the old side panel to make up the difference but it was a thin veneer over plywood and the screws stripped it out and were not reaching far enough into the frame to catch. Even though I had predrilled the holes, a small section of the frame had split off. I know when it is time to quit a project. I went to bed and devised a plan to fix my screw-up.
I took some hardwood pieces leftover from my bedroom parquet floor project and cut them to size. I predrilled them and using liquid nails attached them to the recessed cut in the frame. After waiting overnight for the adhesive to dry, I attached the hinges to the frame and the doors to the hinges. I also made the cut on the left side a little extra tall to allow for small vertical door adjustment that I did end up needing. The door hinges were slotted allowing for small adjustments.
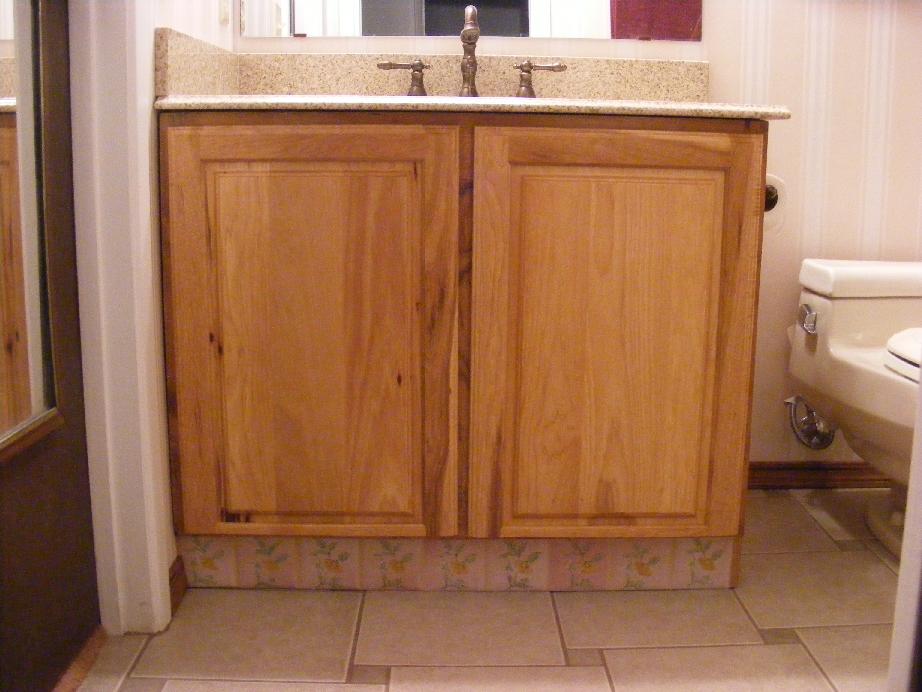
Adding the door handles was fairly easy. I wanted them slightly above the middle of the door where I thought they would look best from eye level and still be easily accessible. I marked and drilled the two holes for each handle and then attached the hardware.
I have to say that I am very proud of the final result. The doors are hung just where I wanted them and for a first time project of this type I think it turned out very well. Was it worth all of the work? In my case unemployed and with lots of time, I think so. Besides, this is now what you might call a real custom vanity.
| Granite Vanity Top & Sink | Pegasus | $199.00 | Home Depot |
| Granite Vanity Top Splash Guard | Pegasus | $19.97 | Home Depot |
| Silicone | GE | $5.82 | Lowes |
| Oil Rubbed Bronze Faucet Set | Pegasus | $70.00 | Habistore |
| Supply Lines | Lasco | $5.78 | Ace |
| 1 1/2 x 6 Inch Drain Extension | Lasco | $1.45 | Ace |
| Adhesive | Liquid Nails | $1.35 | Lowes |
| 1/4" Dowel Pins | Wolfcraft | $1.99 Appx | Home Depot |
| Colored Wood Filler/Putty | Elmers | $1.96 | Lowes |
| 2 x Cabinet Doors | Mills Pride | $10.00 | Habistore |
| Hidden 35 mm hinges | Hickory | $15.88 | Lowes |
| Cabinet Door Handles | Amerock | $5.94 | Home Depot |
| Cabinet Door Bumpers | Waxman | $1.72 | Lowes |
| Vanity Set Total | N/A | $340.86 | N/A |
|
|
|
|
|
| Pecos SoftWareWorks Home | Contact Me | Terms of Use Rev 09/30/10 | Privacy Policy Rev 05/20/09 | About Us | Site Map |
| Tweet |
|
||
|
© Copyright 2007-2015 Alan Norton None of the content may be used or reproduced without written authorization from Alan Norton. |
|||