Custom Search
|

|
|---|
|
|
|---|
|
|
|---|
|
Custom Search
|
|
|---|
Recommended for developers:

![]()
Lesser Goldfinch family preening
![]()
LCD Vs. CRT - Do LCDs finally match CRTs in picture quality?
ECS P965T-A Motherboard
ABIT AN8 SLI Motherboard
Foxconn 975X7AB-8EKRS2H Motherboard
Foxconn BlackOps Motherboard
![]()
My misadventures flying with Allegiant Air
![]()
The Missing Post Mystery
A post I made to a Vista newsgroup was missing from the Outlook newsreader
Where did it go?
The Missing Post Mystery Revisited
It happened again! A post I made to a Vista newsgroup was missing from the Vista Mail newsreader
Where did it go?
A Case of Maxtaken Identity
When is a hard drive not a hard drive? Find out when!
![]()
Changes to the Windows 7 Taskbar You Should Know About
Vista Image Capture 'Slipstream' SP1 and SP2 into a single Vista install disc
Detailed Instructions for Reverse Integrating SP1 and SP2 into Vista
What is RAID? Some RAID Basics
RAID 5 on a Desktop PC
How to Personalize Windows Vista
Develop and Implement a Personal Backup Plan
Ten things you can do to create better documentation
(Tech Republic)
Flash Your BIOS
Three Good Reasons for Flashing Your BIOS
Ten common mistakes you should avoid when flashing your BIOS
(Tech Republic)
Find a new dial-up ISP
Sign up for 10 free hours of NetZero access!
Create a Shutdown/Sleep/Restart or Continue Icon For the Vista Desktop
What is a computer guy doing with home remodeling projects on his Website?
The Upscale Utility Room Remodel with Catch Basin and Wraparound Ceramic Tile Wall
The Bathroom Remodel for Under $1000 Project
The Do It Yourself Bedroom Engineered Prefinished Red Oak Wood Flooring Installation From Hell
Bedroom Remodel With Wood Parquet Flooring
Use Comodo Internet Security 4.0 to Lock Down Your PC Following a Windows Install or Reinstall
![]()
The Northstar Horizon Microcomputer
![]()
Round-Tailed Ground Squirrels

Prairie Dogs

American Kestrel Falcons "Sparrow Hawk"

Arizona Sonoran Desert

Arizona Sunsets

Cienega Creek
Trains In the Desert

Desert and Mountain Flowers

Fox Squirrels

![]()
The Other Reason Why Your Irrigation Valve Might be Leaking
My Response to the Newegg Affiliates Program Changes
Playing the Rebate Game
Know the Rules Before You Play
Vista Confusion
The four questions you need to ask before buying Vista

If you have a cracked ceramic floor tile you may have decided that it is time to replace it. If it is in a location like a laundry room or bathroom where it can get wet a ceramic floor tile should be replaced, if possible, to prevent further cracking and water damage to existing tiles.
It is difficult to take that first blow to the damaged tile, but that is exactly what you have to do to replace it. Before you take that first step you need to be sure that you have a matching tile in color, texture, height and size and matching grout in color and type.
While placing two tiles on the wall to check the cuts for the washer drain pipe the bottom tile slipped and fell onto the ceramic tiles already in place on the catch basin floor. The tile that fell was damaged and needed to be replaced. I noticed that floor tile had a small chip, barely noticeable. I planned to seal it and forget about it. It was later that I discovered that a crack had developed in the floor tile. This probably occurred after the impromptu drain test. When water can get into a tile it can easily lead to a crack in the tile.
So I found myself ready to bang away at my newly installed tile. I had plenty of replacement tiles but I would rather not have to spend the hour and a half to remove the tile and replace it - lessons learned the hard way.
If you don't have a cache of replacement tiles, you will be lucky to find an exact match for any cracked tiles that you are trying to replace. You can try your local ceramic tile stores but if it is an older tile, you might want to pay a visit to a Habitat for Humanity Habistore. They will often have odd lots of older ceramic tile.
You will also have to match the existing grout color. If you don't know the name of the color it can be difficult to match. You also need to match the grout type - sanded or unsanded.
Caution! Always use eye protection when striking ceramic tile with a hammer or screwdriver. Small slivers of very sharp pieces of ceramic tile can fly in the air during the removal of the exiting tile.
For your ceramic tile replacement project you will need:
Click on thumbnail to see a larger image
|
|
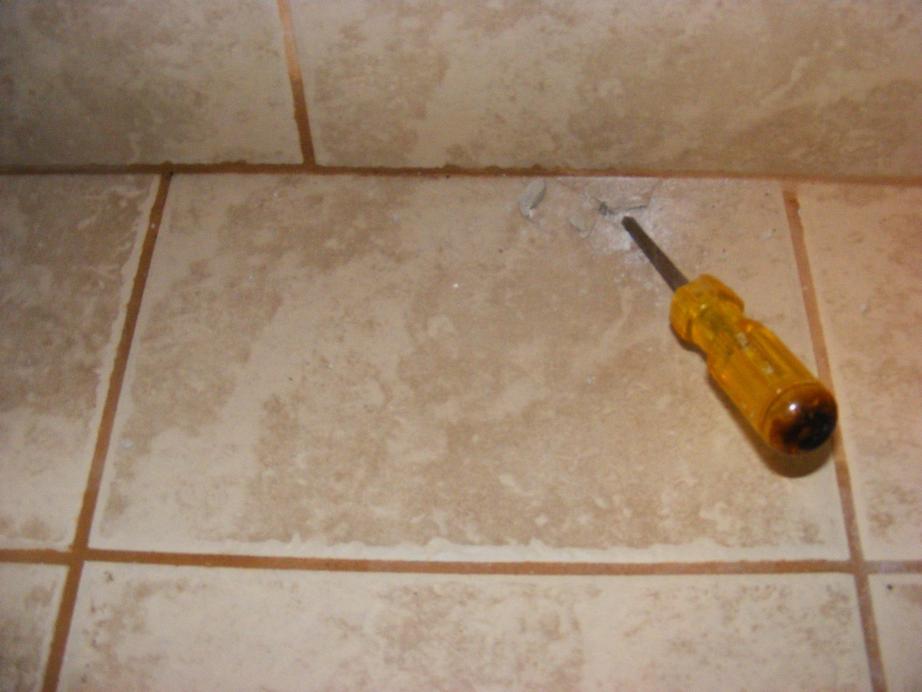
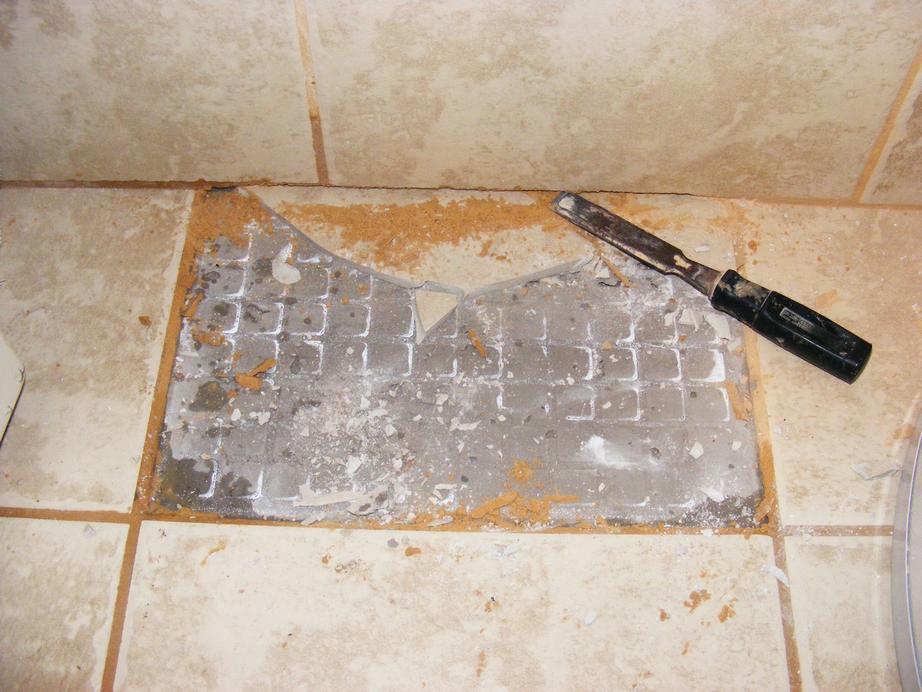
| I have found that an old Philip's head screwdriver is the perfect tool to use to remove an old cracked tile - or a new one as in this case. Use an old screwdriver that you won't mind ruining. The amount of hammering that will be needed to remove the old tile will likely crack the handle, force the metal part into the handle or otherwise ruin the screwdriver. I started in the back of the tile as shown in this picture but found I was too close to the ceramic wall tiles to my liking. | I started over near the front of the tile but not near a grout line. It takes quite a bit of banging to get through the top ceramic glaze and then the tile itself. Be careful though that you do not damage the subflooring. |
|
|

|
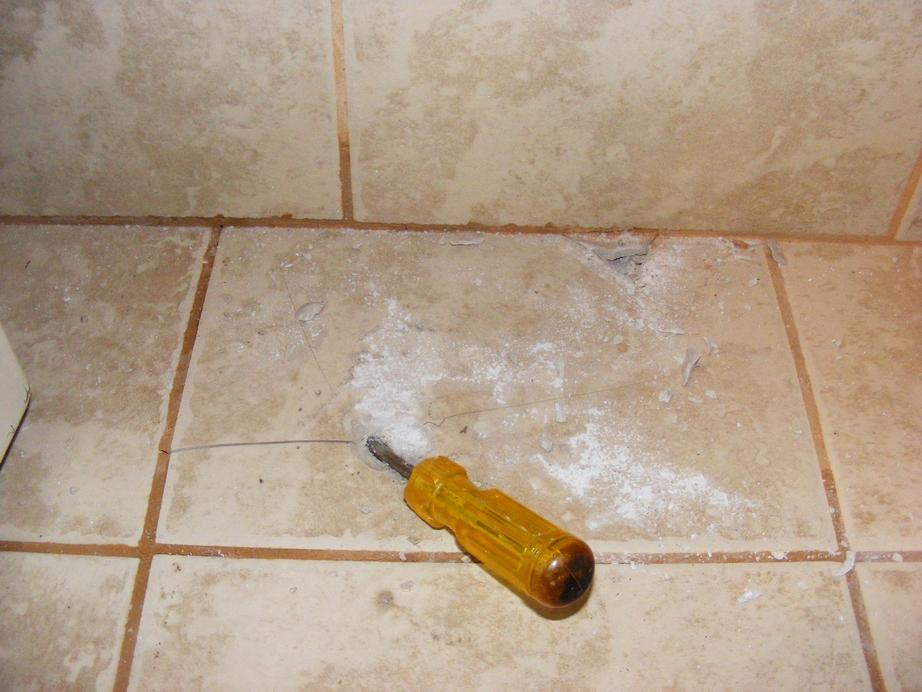
| Once you have broken through the tile to the tile-set below the tile, angle the screwdriver and force the screwdriver under the tile with firm taps from the hammer. | If you have any large pieces of tile that are difficult to remove, use a hammer to lightly tap on the large piece to break it up. |
|
|
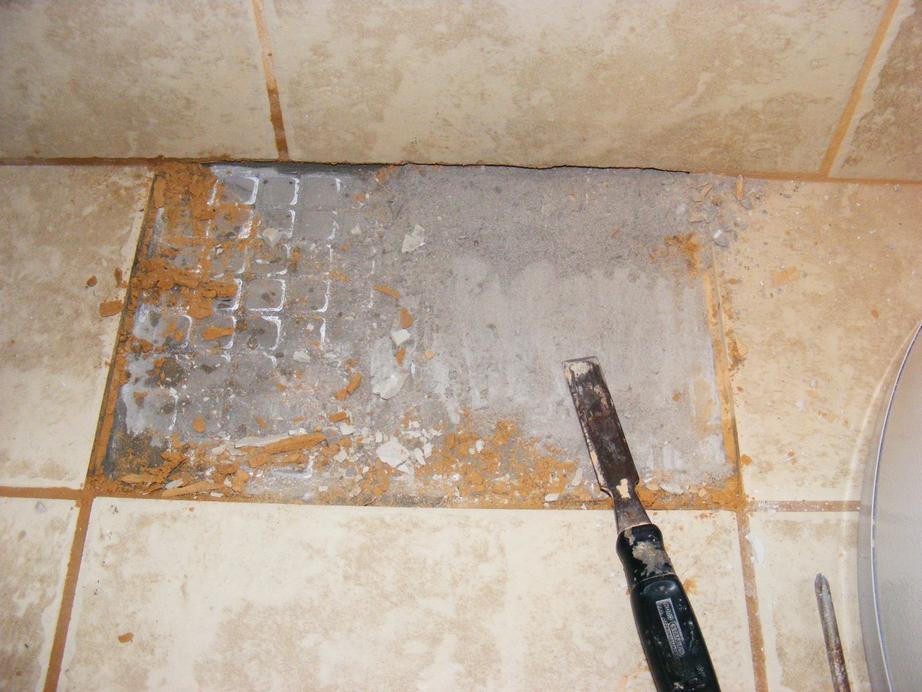
| The rear of the floor tile butts up against the ceramic wall tiles. You may be removing a tile at a corner like this. You don't want to damage the existing adjacent tiles. Carefully remove the grout with a regular screwdriver or a simple wood chisel that I like to use as one of my favorite ceramic tile installation tools. The picture shows that the tile was set properly with no air bubbles. Even some of the residual white material on the tile was transferred to the tile-set. | You don't need a hammer to remove the existing tile-set. Use the chisel or a putty knife and a whisk broom to remove the old tile-set. Be careful not to stir up the tile-set. Breathing in the small particles of the tile-set can damage the lungs. Consider using a dust mask. Don't use a vacuum cleaner. The small dust particles from the tile-set can damage the vacuum cleaner and the dust can escape through the vacuum cleaner's exhaust into the air. I have to be honest here - I used a putty knife to remove the bulk of the tile-set and then did use and old Hoover canister style vacuum cleaner to remove the old tile-set. I did quickly learn to put the canister outdoors, venting the dust outside. I also didn't mind if the vacuum cleaner was damaged. The old Hoover is a real brute - it just keeps on working even with all of my abuse. It now groans in protest when shutting down, but it is still working and a handy companion for all of my remodeling projects. |

|
|
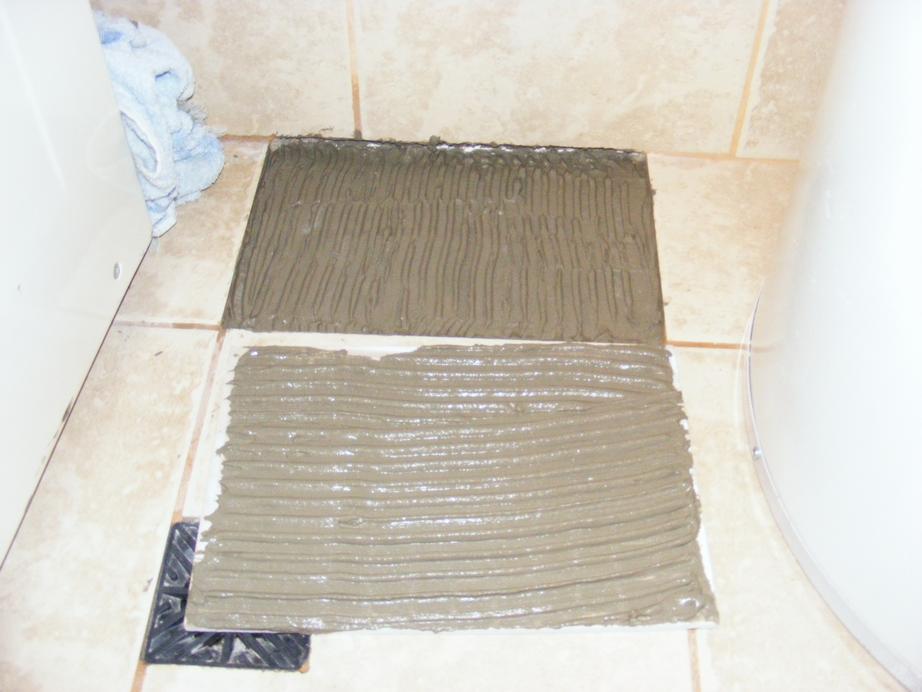
| Be sure to remove all old tile-set and the grout next to the adjacent tiles. You should end up with a clean, dry and flat surface ready to install your replacement tile. | Mud up the new tile. I had mudded both the tile and the floor during the install to insure that there were no air pockets under the tile. I did the same for the replacement. You may not need to do this - just verify that the new tile sits at the same height as the existing tiles. |
|

|
| Set the new tile in place and set the spacers in place. Push the tile down until it is level with the adjacent tiles. | Use a small regular screwdriver to remove the tile-set that oozes between the tiles. |

|
|
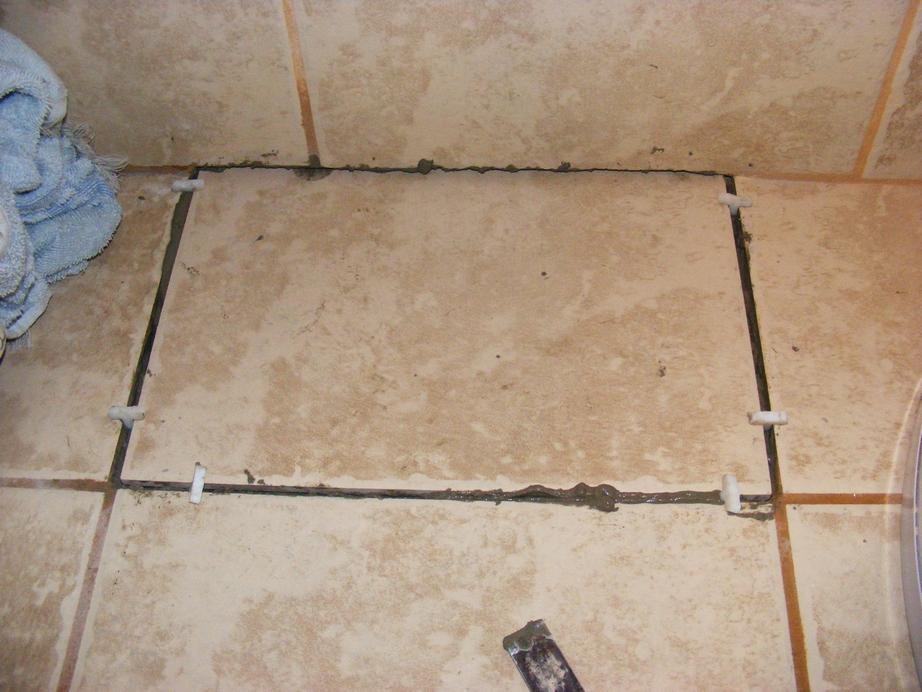
| Allow the tile-set to dry for 12-24 hours minimum before grouting or according to the manufacturer's instructions. After the tile sets for at least twelve hours you can remove the spacers and scrape out any remaining tile-set between the tiles. | After the tile-set is dry, grout the joints with a float. Use a towel or rag to wipe down the joints after the grout begins to set but is still damp (about 15-20 minutes). |
|
|
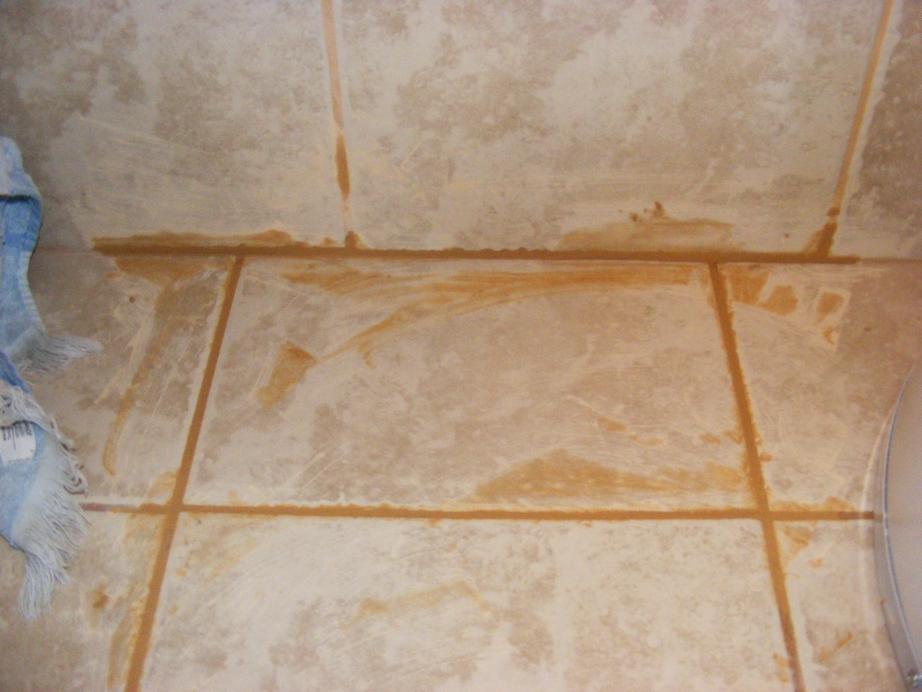
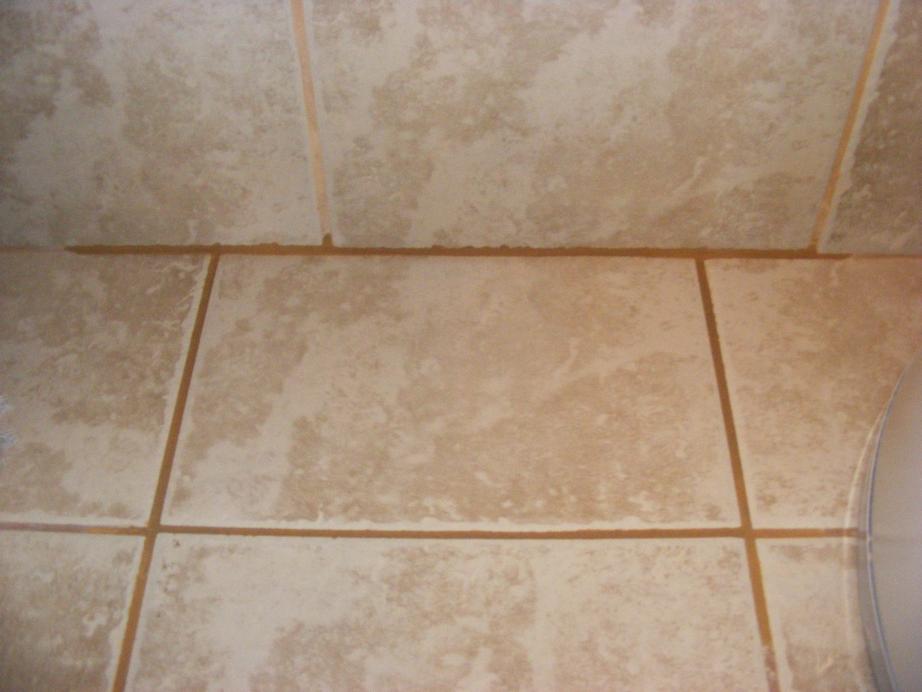
| When the grout has fully cured and is dry (72 hours minimum or according to manufacturer's instructions) don't forget to apply a thin coat of grout sealer. Do a final wipe-down of the film on the tile. Use the towel or rag to remove any excess grout sealer on the grout and any grout sealer that has gotten on the tiles. |
|
|
|
|
|
| Pecos SoftWareWorks Home | Contact Me | Terms of Use Rev 09/30/10 | Privacy Policy Rev 05/20/09 | About Us | Site Map |
| Tweet |
|
||
|
© Copyright 2007-2015 Alan Norton None of the content may be used or reproduced without written authorization from Alan Norton. |
|||